
Welcome to Tried It Tuesday!
I have to say that last Tuesday it felt so strange to not host Tried It Tuesday!
However, I am enjoying a little "time off". This will be the only Tried It Tuesday link up for July but it will be open for you to link up until the next Tried It Tuesday planned for August 6th!
In August Tried It Tuesday will be back to weekly. :)
I would love if you linked up anything you have "TRIED" (new or old, school or personal...anything goes!). Even if you don't link up, check out all the ideas linked up this month when you get a chance. There are SO many creative bloggers and I can barely keep track of all the new ideas linked up!
If you are new to Tried It Tuesday, read more about it here.

Creating Editable Documents for TPT
I am linking this post to the amazing blogger's TPT tips post by Erica Bohrer here in the hopes that it will reach more people and be even more helpful!
 I was ecstatic to read this post by my BBB, Jivey, on making editable documents in Power Point for TPT while still keeping any clipart "locked". Genius, I tell ya!
Jivey has a TON of techy tips on her blog, Ideas By Jivey and they are so easy to find when you click on the page "Techy Tips" in the header.
I was able to use Jivey's tutorial and figured out the differences for a Mac (Jivey is a PC gal and I'm a Mac gal:). So, I asked her if she cared if I made a tutorial for the Mac Version. Of course, she said she didn't mind (Can you see why I adore her?!?). We both just love to share as much as we can and help out fellow teachers! Don't we all? :)
Even if we are not on the same page for our choice in computers, we are on the same page in the sharing department :)
Here are the steps I took to make my APPR Binder Dividers and Organizers for the Danielson and TED rubrics editable (this was LONG overdue and please re-download if you are a buyer!).
First, open your Power Point document (yep, I create all my documents in PPT and highly recommend it!) and delete all the text boxes that you want to be editable. Don't save over your original file with the text boxes, but go to file and save as pictures.
You can save it as a separate PPT file too if you want.
 Once you have your files "saved as pictures", create a new Power Point and rename it with something that tells you this is the editable JPEG version (I mistakenly typed JPED here:).
Next, start importing your JPEG images by making them the slide backgrounds of each individual slide. This leaves the wonderful clipart in place but buyers cannot click on the clipart and copy it or accidentally move it. The only thing they will be able to click on are the text boxes you will add later that they can edit!
 Go to Format and Slide Background.
 Select "Fill" and "Picture" in the choice options.
Then, you will get a choice to "Choose a Picture". Click on that.
 A window will open for you to choose your picture. Go to the folder where you saved the PPT as pictures and select the slide JPEG image to use as your background.
 Select your picture and "Insert".
 You will be back at this screen and then click, "Apply". Do not click "apply to all".
 When you are ready to start adding the text boxes back, you can have two Power Points open at a time and go back and forth copying the text boxes from the original PPT and then pasting them into the new PPT with the slide backgrounds as JPEGs. If you look closely at this screen shot, you can see both of my Power Points open and I will click back and forth between them.
Once the text box is pasted on top of the JPEG, only that part of the page will be editable!
 Once you are all done, you can save the original Power Point as a PDF for buyers who want a PDF and don't need an editable version. Make the PDF secure on a Mac by first selecting "File...Print"!
You will see this screen appear:
 Select the drop down arrow by PDF and select "Save as PDF..." See the blue selection below.
 This screen will appear next and click "Security Options".
 Click the box that says, "Require password to copy text, images, and other content" and type your password and then verify it one more time. Click "OK".
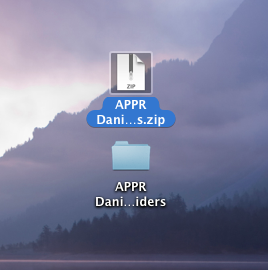
 If you would like to include both the PDF version and editable version with JPEGs, place the two files in a folder as shown here.

 To convert to one file with both versions included in order to add the file to TPT, select the file on your desktop. Go to file and "Compress".
 Your folder will be automatically converted to a zip file that you can now select for your TPT file! Buyers will download the zip file and it will convert to two files (one PDF and one PPT with editable text boxes!).

I am linking this post to the amazing blogger's TPT tips post by Erica Bohrer here in the hopes that it will reach more people and be even more helpful!
Jivey has a TON of techy tips on her blog, Ideas By Jivey and they are so easy to find when you click on the page "Techy Tips" in the header.
I was able to use Jivey's tutorial and figured out the differences for a Mac (Jivey is a PC gal and I'm a Mac gal:). So, I asked her if she cared if I made a tutorial for the Mac Version. Of course, she said she didn't mind (Can you see why I adore her?!?). We both just love to share as much as we can and help out fellow teachers! Don't we all? :)
Even if we are not on the same page for our choice in computers, we are on the same page in the sharing department :)
Here are the steps I took to make my APPR Binder Dividers and Organizers for the Danielson and TED rubrics editable (this was LONG overdue and please re-download if you are a buyer!).
First, open your Power Point document (yep, I create all my documents in PPT and highly recommend it!) and delete all the text boxes that you want to be editable. Don't save over your original file with the text boxes, but go to file and save as pictures.
You can save it as a separate PPT file too if you want.

Next, start importing your JPEG images by making them the slide backgrounds of each individual slide. This leaves the wonderful clipart in place but buyers cannot click on the clipart and copy it or accidentally move it. The only thing they will be able to click on are the text boxes you will add later that they can edit!


Then, you will get a choice to "Choose a Picture". Click on that.


Once the text box is pasted on top of the JPEG, only that part of the page will be editable!

You will see this screen appear:


Here is the folder on my desktop.


I hope this tutorial can help another Mac user make their products editable. :)
Thanks for reading!
Tried It Tuesday will be back weekly in August!!
Don't forget to enter my blogiversary/birthday giveaway by
July 11th for a $50 gift card or the scavenger hunt hosted by I'm Lovin' Lit where everyone wins!
Such a great tutorial for all the Mac users, Holly!
ReplyDeleteJennifer
Mrs. Laffin's Laughings
Thanks Holly. I love my iphone, ipad, classroom ipods, you probably get where I'm going with this. I want an apple computer too! :) This is a great tutorial and I will use the mac version one day. :) Thanks for hosting. Have a super Tuesday!
ReplyDelete~Brandee
Creating Lifelong Learners
Thanks so much for posting this, Holly! I am starting to use Keynote for making my things and the process you posted works perfectly for me. :)
ReplyDelete-Lisa
Grade 4 Buzz
Thank you, thank you for posting this!! I was thinking I had to purchase some Adobe suite. YAY!
ReplyDeleteLauren
The Sweetest Thing
Follow me on Bloglovin'!
I tried this during the past week as well!
ReplyDeleteJessica
Literacy Spark
I'm a PC girl, but I'm planning on trying this soon!!! Thanks for hosting!
ReplyDeleteJoanne
Head Over Heels For Teaching
You are awesome Holly! Simply amazing. Great tutorial!
ReplyDeleteTina
Crofts' Classroom
I have been curious about how to make editable documents for TPT for a long time. Thank you for providing such a detailed post on how to do this. I can't wait to try it out on some of my upcoming products on my to-do list this summer!
ReplyDeleteJennifer
Elementary School Garden
This is a great post Holly. We are shopping for a new laptop this week. It is great to know that I can by a Mac or PC and you and Jivey will have me covered :) I love when I get an editable version of a product, it is so helpful, I bet your buyers are happy too!!
ReplyDeleteThanks for the wonderful tutorial! I had no idea how to begin making an editable document, but I'm sure I could make it happen with this tutorial!
ReplyDeleteCourtney
Polka Dot Lesson Plans
So funny, I love I'm iPad, iPhone, but just love my PC too! ;-) thanks for hosting!!
ReplyDeleteJivey
Thank you so much for posing this! There are so many great link ups today, it might take me all day to read through them!! :)
ReplyDeleteTheresa
Pinkadots Elementary
I just read through more carefully and realized I never do the password protection part. Ooops...
ReplyDeleteJessica
Literacy Spark
This is great. Can you do this in Pages (or something like this....I'm going to have to try and find out.
ReplyDeleteexcellent tutorial, it has been bookmarked for future use.
matt
Digital: Divide & Conquer
Great tutorial! This took me forever to figure out, but has made my TpT products so much better. Wish I had had this tutorial to reference.;)
ReplyDeleteKristin
iTeach 1:1
Thank you so much! I am still learning how to use my Mac and transferring from Word to PowerPoint for my creations. I am adding this to my reading list to refer to.
ReplyDeleteThe Traveling Teacher
http://thetravelingthirdgradeteacher.blogspot.com
This is a wonderful tutorial! I have a question about linking up- I am brand new to this and this would be my very first one! However, when I go to grab your button and post it on my page, it says that the user has removed that image. Help!
ReplyDeleteThank you for trying to link up!! Something happened with photobucket and it has been a nightmare! Can you just right click on the image or control+click for a Mac and the save the image? Then, you can import the picture in your blog post and either link the image to the URL or link some text in your post. Let me know if that works! Is that happening for the Tried It Tuesday button or my blog button?
DeleteHolly
I only tried your Tried It Tuesday button- But I will definitely try your suggestion! I was going to do that, but I wasn't sure if that was ok :) Thank you so much for responding! :)
DeleteThanks for posting this!! Can't wait to start with all my things for TpT and using PPT!!
ReplyDeleteEmily
Style Closet to Classroom
Hi, where were you a couple of weeks ago?? haha!I tried figuring this out then and ended up finding a great tutorial from Ms. Jessica @ "A Turn to Learn."
ReplyDelete~Traci
The Bender Bunch
THANK YOU so much!!! I've been trying to figure out how to do this when using other teachers' created background without it being able to take the art apart :) Such a life saver :)
ReplyDeleteFound you through the Bender Bunch. I love this linky idea and plan to link and visit again in the future. When I first read this post I read it as edible not editable documents. I couldn't wait to see how you were going to eat something from powerpoint. LOL
ReplyDeleteGreat tutorial! I use Adobe Pro to make mine editable. I will definitely have to try this.
ReplyDeleteThanks!
24/7 Teacher: Amy Harrod
Thanks for the great information!
ReplyDeleteI blog over at my personal blog Beyond the Gradebook and I just started my own teaching blog yesterday at Elementary Exploration. I'd love to have you visit my new blog! Also, I'm moving from fifth grade to fourth grade this year and I'm so excited!!
Thanks for the help with the no-reply blogger! Hope it worked :)
ReplyDeleteEmily
This comment has been removed by the author.
ReplyDeleteThis is so great! Thank you!!!!! I am going back and redoing some of my products tonight. Thank you for showing how to make it editable AND how to include an editable product and non-editable product in one download. So so so helpful!!!!
DeleteTheEducatedCrown.blogspot.com