
Welcome to Tried It Tuesday!
I have to say that last Tuesday it felt so strange to not host Tried It Tuesday!
However, I am enjoying a little "time off". This will be the only Tried It Tuesday link up for July but it will be open for you to link up until the next Tried It Tuesday planned for August 6th!
In August Tried It Tuesday will be back to weekly. :)
I would love if you linked up anything you have "TRIED" (new or old, school or personal...anything goes!). Even if you don't link up, check out all the ideas linked up this month when you get a chance. There are SO many creative bloggers and I can barely keep track of all the new ideas linked up!
If you are new to Tried It Tuesday, read more about it here.

Creating Editable Documents for TPT
I am linking this post to the amazing blogger's TPT tips post by Erica Bohrer here in the hopes that it will reach more people and be even more helpful!
 I was ecstatic to read this post by my BBB, Jivey, on making editable documents in Power Point for TPT while still keeping any clipart "locked". Genius, I tell ya!
Jivey has a TON of techy tips on her blog, Ideas By Jivey and they are so easy to find when you click on the page "Techy Tips" in the header.
I was able to use Jivey's tutorial and figured out the differences for a Mac (Jivey is a PC gal and I'm a Mac gal:). So, I asked her if she cared if I made a tutorial for the Mac Version. Of course, she said she didn't mind (Can you see why I adore her?!?). We both just love to share as much as we can and help out fellow teachers! Don't we all? :)
Even if we are not on the same page for our choice in computers, we are on the same page in the sharing department :)
Here are the steps I took to make my APPR Binder Dividers and Organizers for the Danielson and TED rubrics editable (this was LONG overdue and please re-download if you are a buyer!).
First, open your Power Point document (yep, I create all my documents in PPT and highly recommend it!) and delete all the text boxes that you want to be editable. Don't save over your original file with the text boxes, but go to file and save as pictures.
You can save it as a separate PPT file too if you want.
 Once you have your files "saved as pictures", create a new Power Point and rename it with something that tells you this is the editable JPEG version (I mistakenly typed JPED here:).
Next, start importing your JPEG images by making them the slide backgrounds of each individual slide. This leaves the wonderful clipart in place but buyers cannot click on the clipart and copy it or accidentally move it. The only thing they will be able to click on are the text boxes you will add later that they can edit!
 Go to Format and Slide Background.
 Select "Fill" and "Picture" in the choice options.
Then, you will get a choice to "Choose a Picture". Click on that.
 A window will open for you to choose your picture. Go to the folder where you saved the PPT as pictures and select the slide JPEG image to use as your background.
 Select your picture and "Insert".
 You will be back at this screen and then click, "Apply". Do not click "apply to all".
 When you are ready to start adding the text boxes back, you can have two Power Points open at a time and go back and forth copying the text boxes from the original PPT and then pasting them into the new PPT with the slide backgrounds as JPEGs. If you look closely at this screen shot, you can see both of my Power Points open and I will click back and forth between them.
Once the text box is pasted on top of the JPEG, only that part of the page will be editable!
 Once you are all done, you can save the original Power Point as a PDF for buyers who want a PDF and don't need an editable version. Make the PDF secure on a Mac by first selecting "File...Print"!
You will see this screen appear:
 Select the drop down arrow by PDF and select "Save as PDF..." See the blue selection below.
 This screen will appear next and click "Security Options".
 Click the box that says, "Require password to copy text, images, and other content" and type your password and then verify it one more time. Click "OK".
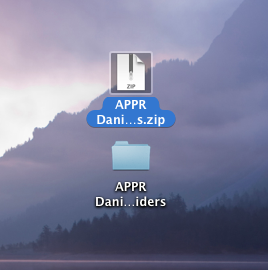
 If you would like to include both the PDF version and editable version with JPEGs, place the two files in a folder as shown here.

 To convert to one file with both versions included in order to add the file to TPT, select the file on your desktop. Go to file and "Compress".
 Your folder will be automatically converted to a zip file that you can now select for your TPT file! Buyers will download the zip file and it will convert to two files (one PDF and one PPT with editable text boxes!).

I am linking this post to the amazing blogger's TPT tips post by Erica Bohrer here in the hopes that it will reach more people and be even more helpful!
Jivey has a TON of techy tips on her blog, Ideas By Jivey and they are so easy to find when you click on the page "Techy Tips" in the header.
I was able to use Jivey's tutorial and figured out the differences for a Mac (Jivey is a PC gal and I'm a Mac gal:). So, I asked her if she cared if I made a tutorial for the Mac Version. Of course, she said she didn't mind (Can you see why I adore her?!?). We both just love to share as much as we can and help out fellow teachers! Don't we all? :)
Even if we are not on the same page for our choice in computers, we are on the same page in the sharing department :)
Here are the steps I took to make my APPR Binder Dividers and Organizers for the Danielson and TED rubrics editable (this was LONG overdue and please re-download if you are a buyer!).
First, open your Power Point document (yep, I create all my documents in PPT and highly recommend it!) and delete all the text boxes that you want to be editable. Don't save over your original file with the text boxes, but go to file and save as pictures.
You can save it as a separate PPT file too if you want.

Next, start importing your JPEG images by making them the slide backgrounds of each individual slide. This leaves the wonderful clipart in place but buyers cannot click on the clipart and copy it or accidentally move it. The only thing they will be able to click on are the text boxes you will add later that they can edit!


Then, you will get a choice to "Choose a Picture". Click on that.


Once the text box is pasted on top of the JPEG, only that part of the page will be editable!

You will see this screen appear:


Here is the folder on my desktop.


I hope this tutorial can help another Mac user make their products editable. :)
Thanks for reading!
Tried It Tuesday will be back weekly in August!!
Don't forget to enter my blogiversary/birthday giveaway by
July 11th for a $50 gift card or the scavenger hunt hosted by I'm Lovin' Lit where everyone wins!


